SharePoint Permissions Overview
Users within SharePoint are granted permissions to objects such as Sites, Lists, Folders and List Items. The permission that the user receives can be granted in many ways such as directly against the user account, against a SharePoint Group that the user happens to be a member of, or by Active Directory Group. Active Directory Groups can also be nested within a SharePoint group. There are many circumstances that can affect a user’s permissions to a particular object which may not be obvious to you when trying to establish what permissions a user really has.
There are many different permissions that people can receive to a particular object. These permissions are split into three categories:
- · Site
- · List
- · Personal
The Site permissions effect what you can do with the Site itself and include permissions such as: Manage Web Site, Apply Themes and Borders, and Create Subsites. List permissions effect what you can do with a list and include that of: Add Items, Edit Items, and Delete Items. Personal permissions control the ability to create personal views, Add personal web parts, or update personal web parts.
In total there are around 12 List Permissions, 18 Site Permissions and 3 Personal Permissions. To make your life easier, permission levels exist that already contain many of these permissions. For example, the Contribute Permission Level includes the ability to Add items and Edit Items amongst many others. Therefore you do not usually have to be concerned with granting individual permissions to each SharePoint user. Permission Levels that exist Out-of-the-Box include:
- · Full Control
- · Design
- · Contribute
- · Read
- · Limited Access
- · View Only
- · Approve
- · Manage Hierarchy
- · Restricted Read
Note: These permissions levels are explained in detail later on within this whitepaper.
As well as the Out-of-the-Box permissions levels, you will find that you can also create your own custom permission levels. For example, you may want a permission level somewhere between Read and Contribute that perhaps doesn’t offer permissions such as Delete Items or Manage Personal Views.
You can probably imagine how difficult it would be to keep track of hundreds of individuals who are granted different permission levels. Therefore there is a more logical way to organize users into groups, and then assign the permissions to the groups instead of against a user directly. Your organization may make use of Active Directory Groups that already exist, as well as making use of SharePoint Groups.
To summarize, the below diagram details how permissions may be granted to users within your SharePoint Sites. Permissions may be assigned to Users or Domain Groups via a SharePoint Group or they can be assigned a permission level directly.

Figure 1 – The diagram shows how permissions are assigned to users either directly or via SharePoint Groups.
Throughout your Site Collection, each object will have an Access Control List (ACL). The ACL contains the assignment of Permissions to each account for the object. When a new object such as a sub site, list, folder or list item is created, its ACL is inherited from the parent object. Therefore, a user who has contribute permissions to a site, will be granted permissions to each list, folder and list item within the site unless permissions inheritance is broken. The below diagram shows how permissions are inherited and where permission inheritance may be broken.

Figure 2 – An example Site Collection showing how objects within a site collection can have broken or inherited permissions
Throughout this whitepaper, you will learn how to create and manage SharePoint Groups as well as Permission Levels, Manage Permission Inheritance and understand the permission reports.
SharePoint Groups
SharePoint Groups act as a method of containing a number of users or domain groups as a single entity. As a single entity, permissions can be assigned to the group against objects such as Team Sites, Libraries, Lists and List Items. Assigning permissions to a single entity rather than multiple user accounts or domain groups makes management of permissions easier. Users can be added or removed from the group(s) which will immediately affect the permission that they were granted.
During the provisioning of a new Team Site, you will be able to click the ‘More Options’ button and choose whether permissions are inherited or not from the parent site. If you select the radio button to allow unique permissions, you will have the opportunity to create up-to three new SharePoint groups which will be scoped at the newly provisioned site. If you select to inherit permissions, you will inherit the groups from the parent site.

Figure 3 – Permission inheritance options when creating a new team site
Three groups can be created:
1. 1. Owners of this Site
2. 2. Members of this Site
3. 3. Visitors to this Site
The owners group is granted Full Control permissions by default, the Members group will be assigned Contribute Permissions and the Visitors Group should you opt to create it will be assigned Read permissions. By default, the account that you are signed in as will become a member of the Owners and Members groups. However, at this stage you have the ability to change the memberships of these groups.

Figure 4 – Default SharePoint Groups.
Within the next section, we will explore the default SharePoint Groups and how you manage the memberships of them.
Default Groups
There are three default groups when you first create a sub site (sub web) from a parent site if you have opted for unique permissions. Each group by default is named with a the Team Site name as the prefix followed by Owners, Members and Visitors. As described above, the Owners site is granted Full Control, Members is assigned Contributors and Visitors is assigned Read permissions. You can change the permission level that these groups are assigned, but that will get confusing the larger your environment gets.

Figure 5 – Default SharePoint Groups.
There is a More… link on the same People and Groups – Permission Members page that will show other groups defined within the current site collection. By clicking that more link you will be presented with the other groups and for some will also be able to see at which site they are scoped at. This screen is often confusing as it is not clear which of these groups will only affect this particular site. By changing other groups members, you will be changing the members permissions not just to this site but to other objects as well.

Figure 6 – Site Collection Groups list
Custom Groups
SharePoint Groups are often better understood if they are named after a role. This way you can apply better business logic when assigning permissions to SharePoint objects. E.g. within a Team Site provisioned for managing a Customer, you may have Sales Executives, Sales Managers, and Accounts. Each of these groups may be assigned a different permission to the team site itself and the objects within the team site. Although typically you would have such groups defined within your Active Directory, it is sometimes the case that you want smaller sets of users within your groups who perhaps work at a particular location or division of the organization.
When you create a new group, you can provide a name and description. Providing a detailed description is advisable so that users know exactly what the purpose of that group is. The Group Owner can manage the members of the group. This is quite a powerful feature as you as a Site Owner can create a group allowing another member to manage it. E.g. It may make more sense for a Sales Manager to manage the Sales Executives group that it would for the IT Department. It is important to note that you can only add one person as the group owner. In some circumstances, it would make sense to add a Active Directory group as the owner rather than an individual. That way the group can be managed by multiple Sales Managers. Plus if the only Owner leaves the organization, you cannot change the membership easily.
You can also control who can view the group membership. Group Members is the default, but it can be changed to Everyone.
Editing the group members can also be done via other group members if you set Group Members radio button in the ‘Who can edit the membership of the group?’ section.
Depending on the type of group, you may want to enable users to request to join a group in which case the Group Owner can approve the request. You can also allow people to subscribe themselves by allowing Auto-accept requests. You can specify which email address the requests should go to within the properties of the new group.

Figure 7 – Creating a new custom group
Finally, you can set what permissions the group will have to this site. Note that you are controlling the permissions to just this site, and that the group can be used against other objects and therefore be assigned other permissions to those other objects.
Managing Groups
To add new users to your group, choose Site Settings, from the Site Actions menu and the People and Groups. You can then click New, Add Users to add a new user to the group.

Figure 8 – Adding a user or domain group to a SharePoint group
Enter the name of the user that you wish to add, and then click onto the Check Names button or press CTRL+K.

Figure 9 – Adding a user to a group.
Removing a user from a group is also quite simple. You can check the check box against the user that you wish to remove, and then choose Actions, Remove Users from Group.

Figure 10 – Removing a user from a Group.
SharePoint Permission Levels
SharePoint Groups or accounts such as a domain user or domain group can be assigned permissions to a SharePoint object such as a Site, List, Library, Folder or List Item. Permission Levels such as Contribute and Read are made up of individual permissions. Within this section we will explore the Out-of-the-Box permissions levels before exploring how we can create custom permission levels.
Out-of-the-Box Permission Levels
To access the Out-of-the-Box permissions, choose Site Actions, Site Permissions. You will be able to see a list of users/groups that have permission to your team site. Within the Permission Tools ribbon, click Permission Levels to see the existing permission levels.

Figure 11 – Accessing Permission Levels
The Out-of-the-Box permission levels include:
| Full Control | User will receive every SharePoint Permission unless the permission has been removed via a Permission Policy. The permission level cannot be modified. |
| Design | Users with Design Permissions can virtually do everything with the exception of Manage Permissions on the Site, View Web Analytics Data, Create Subsites, Manage Web Site, Create Groups, Enumerate Permissions and Manage Alerts. Users with this permission level can create, edit and delete list items as well as make design changes to the Shared views of the site and lists. |
| Contribute | Contributers can create, edit, and delete items within lists and libraries. They have the same restrictions as Design plus they cannot manage the look and feel of sites or shared views. They cannot apply themes, styles, or modify pages. |
| Read | Readers have the same restrictions as Contributers. In addition they cannot Create, Edit or Delete Items. They can only open items to read them. They also do not get any personal permissions and therefore cannot add or remove personal web parts, manage personal views or edit personal user information. |
| Limited Access | Limited Access provides you enough permissions to navigate to an item that you do have permission to. For example, you may have been granted Read permissions to a Document within a library that had broken permission inheritance. If you did not have permissions granted to you for the site or library that contained the document, you would be granted limited access which allows you to navigate to the document without seeing any other content. Limited Access is often incorrectly reported in the permission reports. E.g. A user may have Full Control to a Site via a Domain Group. They are also granted permissions directly to a document. The user would then be listed as having Limited Access instead of Full Control to the Team Site. |
| View Only | The same as read but cannot download documents. Can only view them in the browser. |
| Approve | Very similar to contribute but also has Approve Items permission. |
| Manage Hierarchy | Virtually the same as Full Control but does not have Design change options such as apply theme. Used by users who are likely to move sites around. |
| Restricted Read | Can view pages and documents, but cannot view historical versions or user permissions. |
Creating Custom Permission Levels
You can change the existing permission levels or create your own permission levels at the root site level in the site collection only. In SharePoint 2007, this could be done at sub site level. It is possible to break permission level inheritance but only through the Object Model but that is beyond the scope of this article. You will find a good explanation here: http://stackoverflow.com/questions/7038444/programatically-break-permission-level-inheritance
Note: I would recommend never changing the existing permission levels as that would be very confusing to users who expect a permission level to behave within a certain way.
The reason for creating a custom permission level will be specific to your needs. It might be that you want for example a permission level that lies somewhere between Read and Contribute. Perhaps you want users to be able to Add and Edit items but not Delete.
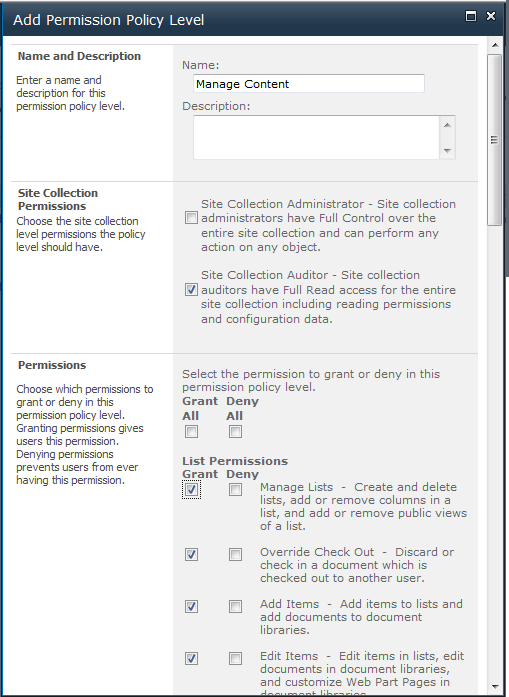
You can create a custom permission level in two ways. Firstly, you can create them from scratch and select each permission that you would like the permission level to have. Or you can copy an existing permission level, provide it a new name, and then apply the changes to the new copy.
To create a new permission level from scratch:
1. 1. Ensure that you are a Site Owner with the Manage Permissions role.
2. 2. Click Site Actions, Site Permissions.
3. 3. Click the Permission Levels button
4. 4. Click the Add a Permission Level action button.
5. 5. Provide a Name and Description for your custom permission level.
6. 6. Check the Site, List, and Personal permissions that you wish to grant to the permission level.
7. 7. Click Create.

Figure 12 – Creating a custom permission level from scratch.
To create a custom permission level by copying an existing permission level:
1. 1. Ensure that you are a Site Owner with the Manage Permissions role.
2. 2. Click Site Actions, Site Permissions.
3. 3. Click the Permission Levels button
4. 4. Click on an existing permission level such as Contribute.
5. 5. Scroll to the bottom of the page.
6. 6. Click the Copy Permission Level button.

Figure 13 – Copying a Permission Level.
7. Provide a Name and Description for your custom permission level.
8. Make the desired changes by selecting or deselecting the permissions check boxes.
Assigning Permissions Levels
Permission Levels can be assigned to Users, Local Groups or Domain Groups as well as SharePoint Groups. There are different opinions on what you should do. However, my personal preference is to use add domain groups to SharePoint Groups in order for permissions to be granted rather than assigning domain groups permissions directly. Within your environment, you may find granting permissions directly to Active Directory users or groups works best.
To assign permissions to a SharePoint Group:
1. 1. Choose Site Actions, Site Permissions.
2. 2. Check the box of the group that you would like to modify.
3. Click the Edit User Permissions button

Figure 14 – Editing permissions for a SharePoint group
3. Check the permission level that you would like to grant to this SharePoint Group.

Figure 15 – Assigning the custom permission level
4. Your SharePoint Group will now have permissions to the Site and anything that inherits permissions from the site such as sub webs or Lists/Libraries.
Assigning permission to Active Directory Groups or Users:
1. Click Site Actions, Site Permissions.
2. Click the Grant Permissions button on the ribbon.
3. Enter or lookup the name of the user or group that you wish to grant permissions to.
4. Select the radio button to Grant Permissions directly.
5. Check the required permission for the user or group.

Figure 16 – Granting permissions to a user or group directly.
SharePoint Permissions
As has already been explained, permission levels are collections of permissions that can be assigned to Users/Groups or SharePoint Groups. It is important to understand not just what each permission level can do in general, but to have an understanding of each permission that can be made available to a permission level.
Permissions are organized into three different categories. We will discuss each permission’s behaviour within the below tables.
Site Permissions
| Manage Permissions | Can create and change permissions for users and groups and change permission levels. |
| View Web Analytics Data | View the analytical reports available through site settings |
| Create Subsites | Have the ability to create sub sites (webs) or workspaces such as meeting workspaces or document workspaces beneath this site. |
| Manage Web Site | Can manage the site settings within the site |
| Add and Customise pages | Add, Remove, Modify pages of the Site using an editor such as SharePoint Designer. |
| Apply Themes and Borders | Apply a theme to the site |
| Apply Style Sheets | Apply a CSS style sheet to the site |
| Create Groups | Create new SharePoint Groups |
| Browse Directories | Browse the files and folders through SharePoint Designer or WebDav interfaces |
| Use Self Service Site Creation | Self Service Site Creation can be turned on or off in Central Administration and allows users to be able to create their own Site Collections |
| View Pages | Can view the pages within the site |
| Enumerate Permissions | Can view the permissions reports against the site/lists and libraries/items and documents |
| Manage Alerts | Can Manage Alerts for users within the site. |
| Use Remote Interfaces | Access the site programmatically through the object model/web services. |
| Use Client Integration Features | Use integrations features through Microsoft Office which are launched through SharePoint. Without this permissions, users will need to upload documents. |
| Open | Allows users to open a Web site, list, or folder in order to access items inside that container. |
| Edit Personal User Information | Allows a user to change his or her own user information, such as adding picture. |
List Permissions
| Manage Lists | Can create/Delete lists. Add remove columns within a list and access most settings on the List settings page |
| Override Check Out | If someone has a document checked out, you can override the checkout although their changes will be discarded. |
| Add Items | Can add items to a list |
| Edit Items | Can edit items in a list including pages in a pages library |
| Delete Items | Can delete items |
| View Items | Can view items in lists and documents |
| Approve Items | Can approve a minor version of a document or list item |
| Open Items | View the source of documents |
| View Versions | View previous versions of a list item or document |
| Delete Versions | Can delete previous versions |
| Create Alerts | Can create alerts |
| View Application Pages | Can view other aspx pages such as View Forms, Views, and enumerate lists. |
Personal Permissions
| Manage Personal Views | Sites are made up of Shared and Personal Views. With this permission you can create, edit and delete your personal views |
| Add/Remove Personal Web Parts | You can add, configure and remove web parts on personal web part pages |
| Update Personal Web Parts | Can set personal properties on Web Parts that affect only you. |
Check Permissions
The permission reports within SharePoint 2010 can be very confusing especially when you consider that there are users who inherit permissions and also when Active Directory groups are used to assign permissions to people directly or through SharePoint Groups. Quite often for example, you will see users listed as having ‘Limited Access’ when in fact their level of permission is much higher. The reason for this is that when running a permission report, you cannot see users that have permissions via Active Directory groups. You can only see that the group itself has permission. If a user of that Active Directory Group is assigned permissions uniquely to an object such as a Library, Folder or List item, they will be granted Limited Access to the site. Limited Access is therefore what will be reported in the permission report. To verify these permissions you can use the Check Permissions option.
Take for example Dmitry below who is reported as having ‘Limited Access’

Figure 17 – Permission report showing Limited Access for user: Dmitry
If we check the permissions for Dmitry, we will see that his permissions to the site are actually higher than what is reported:

Figure 18 – Running Check Permissions against the user account ‘Dmitry’.
We can see clearly that Dmitry has Contribute permissions to the team site through a group called Developers. This is still difficult to work out or double check since you cannot see Dmitry is a member of the Developers domain group without checking Active Directory.
NOTE: This is a problem that is resolved using our DeliverPoint Permissions Management tool which can be seen below:

Figure 19 – Using DeliverPoint to check Permissions you can see the correct permission reporting and enumerate Active Directory groups.
Permission Inheritance
As already mentioned at the start of this article. Almost every object in SharePoint can inherit or have unique permissions. The default when you create a new subsite is for the site to inherit permissions from the parent subsite. All of the Lists and Libraries within that site will also inherit permissions from their parent which would be the site itself. Likewise as you begin to create folders, list items and documents, they will also inherit permissions from their parent container. Nested folders will also inherit permissions from the folder that contains it. Permissions can be broken at any level. When you break the permission inheritance, a copy is made of the permissions from the parent but can now be changed. Therefore you can grant new permissions without affecting the parent. A common mistake is to think that the groups are now independent. If you add a user to a group within an object that has broken permission inheritance, the object will be affected as the new user will gain permissions to it, but the scope of the group will be defined at a higher level and therefore the user will also receive permissions to other object that have permissions granted to that group.
To break permission inheritance within a site:
1. Choose Site Settings, Site Permissions
2. Click the Stop Inheriting Permissions button on the Permission Tools ribbon.

Figure 20 – Breaking permission inheritance at Site Level.
3. The button will toggle allowing you to re-inherit permissions.
To break permissions within a Library or List:
1. Navigate to the List or Library
2. Click List under List Tools
3. Click the List Permissions button on the ribbon
4. Click Stop inheriting Permissions.
To break permissions within a list item or folder:
1. Navigate to the list or library containing the list item or folder.
2. Hover the mouse over the Title of the list item/document or folder.
3. Click Stop Inheriting Permissions.
Understanding where you have inherited or broken permission inheritance is difficult without a third party tool such as DeliverPoint.