| http://www.oracle.com/technetwork/issue-archive/2011/11-sep/o51odt-453447.html Using Entity Framework with Oracle Data Provider for .NET. Object-relational mapping (ORM) technologies enable developers to write object-oriented code against a conceptual model of their data rather than accessing the database directly. For example, with an ORM, a developer can make an update to an instance of an EMPLOYEE class or request a collection of EMPLOYEE instances rather than executing the equivalent UPDATE or SELECT SQL statements against the EMPLOYEES table in an Oracle database. Two popular ORMs for .NET developers are NHibernate and Microsoft’s Entity Framework. Both solutions integrate with Microsoft Visual Studio; leverage designers, wizards, and code templates; and require a layer of code to handle the mapping to an Oracle database. Oracle Data Provider for .NET (ODP.NET) and Oracle Developer Tools for Visual Studio provide that mapping layer as well as Visual Studio enhancements to enable .NET developers to target Oracle Database with their Entity Framework applications. In this article, I’ll demonstrate some common development tasks that use Entity Framework to target Oracle Database. (For information on NHibernate, visit nhforge.org.) Setup To work through the examples in this article, you’ll need Microsoft Visual Studio 2010 Professional (or a later release). You’ll also need to download and install ODP.NET and Oracle Developer Tools for Visual Studio Release 11.2.0.2.40 or later. Both of these products are included as part of the Oracle Data Access Components package, which can be downloaded from the Oracle Technology Network .NET Developer Center. All of Oracle’s .NET products are available for free from the Oracle Technology Network Website. It’s important to note that earlier versions of this Oracle .NET software do not support Entity Framework; the integrated Visual Studio designers will not work properly, and you will see errors such as “The store provider factory type ’Oracle.DataAccess.Client.OracleClientFactory’ does not implement the IServiceProvider interface” if you attempt to run already compiled Entity Framework code. If you are unsure of which version of the Oracle .NET software you have, you can check the About window (Help -> About Microsoft Visual Studio). You should see “Oracle Developer Tools for Visual Studio” followed by the version number. The application you create in this article will use tables that are part of the Oracle database sample HR schema, so you’ll also need access to an Oracle database and the HR schema. To begin the setup for the article, first confirm that you have a connection to the HR schema. From Visual Studio, right-click the Data Connections node in Server Explorer and choose Add Connection. When the dialog box appears, make sure that the Data source is set to Oracle ODP.NET. From the Data source name list, select the database alias and then provide the User name and Password for the HR schema. Download code and SQL scripts for this article and extract the contents. From the Tools menu in Visual Studio, select Run SQL Plus Script. Browse to the location where you extracted the code and SQL scripts, select the HR_SP.SQL script, select the HR connection from the list, and click Run. Check the Visual Studio output window to make sure there were no errors. Right-click the Procedures node in Server Explorer and choose Refresh. The Entity Data Model Wizard and Designer Use the Visual Studio Entity Data Model Wizard as the starting point for building an Entity Framework-based application. To begin, create a new project. From the File menu select New -> Project. Select Visual C#:Windows -> Console Application. Rename the project EntityFramework, and click OK. Open Solution Explorer, right-click EntityFramework, and select Add -> New Item. In the Add New Item window, choose ADO.NET Entity Data Model, enter HRModel.edmx as the Name, and click Add. The Entity Data Model Wizard will appear. In the first screen, Choose Model Contents, select Generate from database, and click Next. Select the data connection that you created earlier and the Yes, include the sensitive data in the connection string radio button. Enter HREntities in the text field under the Save entity connection settings in AppConfig as checkbox and click Next. In the Choose Your Database Objects screen, select DEPARTMENTS and EMPLOYEES from the Tables group and INSERT_EMPLOYEE, UPDATE_AND_RETURN_SALARY, and UPDATE_AND_RETURN_SALARY_BINDV from the Stored Procedures group. Enter HRModel in the Model Namespace field and click Finish. The Entity Data Model Designer will open and display a visualization of the newly created Employee and Department entities and their relationships, as shown in Figure 1.
Figure 1: Entity Data Model Designer Entity SQL Now that you have some entities backed up by ODP.NET and Oracle Database, you can perform operations on them. As entities are created, modified, and deleted, these changes will be automatically reflected seamlessly in Oracle Database. Let’s add some program code to try this out. In Solution Explorer, right-click References and add a reference to Oracle.DataAccess.dll. If multiple versions of the DLL are present, reference Release 11.2.0.2.40 or later. Replace the contents of your new project’s program file (Program.cs) with the code of the Program.cs file included in the code download for this article. There are several namespaces at the top of the file, most importantly System.Linq, System.Data.EntityClient, System.Data.EntityModel, and Oracle.DataAccess.Client. One way to perform queries on entities is to use Entity SQL, which is a SQL-like language. It is backed by the ADO.NET data access model, so the Entity SQL code is very similar to common database-specific ADO.NET implementations such as ODP.NET. The difference is that with Entity SQL, the entities—not the database objects—are queried by Entity SQL. In your updated program file, uncomment the first block of code (// Entity SQL -- Retrieve employees with ID number less than max_id), shown in Listing 1. Build and step through the code. Note that the EntityConnection, EntityCommand, and EntityDataReader classes are created and data is fetched from these entities. Code Listing 1: Entity SQL code for Program.cs // Entity SQL -- Retrieve employees with ID number less than max_id int max_id = 110; string esql = "select e.EMPLOYEE_ID, e.FIRST_NAME, e.SALARY from HREntities.EMPLOYEEs as e where e.EMPLOYEE_ID < " + max_id; EntityConnection econn = new EntityConnection("name=HREntities"); econn.Open(); EntityCommand ecmd = econn.CreateCommand(); ecmd.CommandText = esql; EntityDataReader ereader = ecmd.ExecuteReader(CommandBehavior.SequentialAccess); Console.WriteLine("Entity SQL Result"); while (ereader.Read()) { Console.WriteLine("ID: " + ereader.GetValue(0) + " Name: " + ereader.GetValue(1) + " Salary: " + ereader.GetValue(2)); } LINQ to Entities Another way to perform queries on entities is to use LINQ to Entities. LINQ (Language-Integrated Query) is a general-purpose query facility built into the .NET Framework that accesses all sources of information, including relational data, XML, and now entities. To try LINQ to Entities, first uncomment the second block of code in the program file (// LINQ to Entities query -- Retrieve employees with ID number less than max_id) shown in Listing 2 and examine it. Code Listing 2: LINQ to Entities code for Program.cs // LINQ to Entities query -- Retrieve employees with ID number less than max_id int max_id = 110; var Employees = from e in ctx.EMPLOYEES where e.EMPLOYEE_ID < max_id select e; Console.WriteLine("LINQ to Entities Result"); foreach (var Employee in Employees) { Console.WriteLine("ID: " + Employee.EMPLOYEE_ID + " Name: " + Employee.FIRST_NAME + " Salary: " + Employee.SALARY); } The first section of this code block contains the LINQ query: var Employees = from e in ctx.EMPLOYEES where e.EMPLOYEE_ID < max_id select e; The remaining code in this block fetches and displays employee records. Step through this code and view the results. Calling Stored Procedures Oracle developers can leverage PL/SQL stored procedures, with limitations, within the entity framework via Entity Framework Function Imports (used to call the procedures explicitly) and stored procedure mappings (which are automatically called for entity Insert, Update, and Delete operations). Only Oracle stored procedures can be called by Entity Framework, not stored functions. (Oracle stored functions can be used if they are wrapped inside of a stored procedure that uses an OUT parameter for the stored function return value.) The Entity Framework maps Oracle stored procedures to Entity Framework functions. If an Entity Framework function mapped to a stored procedure is to have a return value other than null, the value must be provided by the Oracle stored procedure as an OUT parameter of the type SYS_REFCURSOR. Furthermore, only the first REF CURSOR in the parameter list is used as the Entity Framework function return value; any other REF CURSORS in the list are ignored. And because the metadata for this REF CURSOR is not known at design time, you must add this information to your App.Config file. Running stored procedures with SYS_REFCURSORs and App.Config configuration. To try out PL/SQL stored procedures with entities, first update the App.Config file. In the files you downloaded, find App.Config.txt and cut and paste the contents into the App.Config file in your project somewhere after the <ConnectionStrings> section. (For more information on the format of this metadata, refer to ODP.NET online help in the “Implicit REF CURSOR Binding Support” section.) Earlier you ran a script (HR_SP.SQL) that created the UPDATE_AND_RETURN_SALARY procedure and added it to the entity model. This procedure accepts an employee ID and a salary increase amount, and then it outputs a REF CURSOR containing the employee’s first name and the new salary. To get your application ready to call the UPDATE_AND_RETURN_SALARY procedure, first open the Model Designer, and then view the Model Browser (see Figure 1). Under HRModel.Store, click the Stored Procedures node, and then right-click UPDATE_AND_RETURN_SALARY. From the menu, choose Add Function Import. In the Add Function Import dialog box (see Figure 2), for Returns a Collection Of, select Complex. Click Get Column Information. The column information will be retrieved from the App.Config file. To call the method from .NET, you will use the name listed in the Function Import Name field (in this case, UPDATE_AND_RETURN_SALARY). Click Create New Complex Type and click OK. In the Model Browser, you will now see UPDATE_AND_RETURN_SALARY under HRModel.edmx -> EntityContainer: HREntities -> Function Imports.
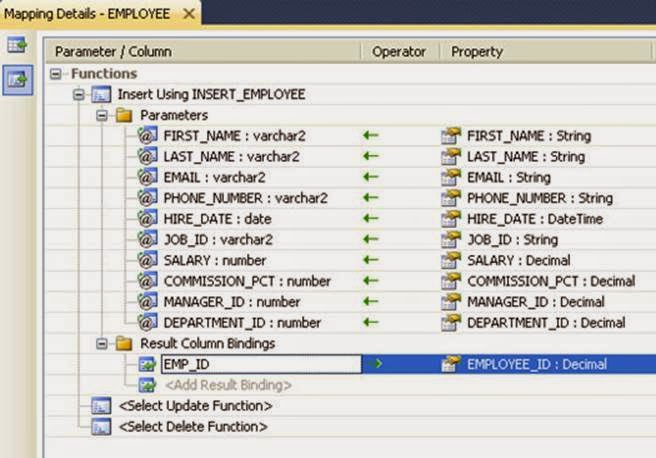
Figure 2: Add Function Import dialog box In your project’s program file, uncomment the next block of code—// CALLING A STORED PROCEDURE VIA IMPORT FUNCTION (RETURNING VALUES)—shown in Listing 3. Build and step into it. Code Listing 3: Code for calling stored procedure in Program.cs // CALLING A STORED PROCEDURE VIA IMPORT FUNCTION (RETURNING VALUES) int empid = 100; int raise = 9000; foreach (var result in ctx.UPDATE_AND_RETURN_SALARY(empid, raise)) { Console.WriteLine("Name: " + result.FIRST_NAME + " Updated Salary: " + result.SALARY); } Console.WriteLine(); Console.ReadLine(); // CALLING A STORED PROCEDURE VIA IMPORT FUNCTION (USING OUTPUT BIND VARIABLE) int empid = 100; int raise = 1111; ObjectParameter newsal = new ObjectParameter("NEWSAL", typeof(decimal)); ctx.UPDATE_AND_RETURN_SALARY_BINDV(empid, raise, newsal); Console.WriteLine(newsal.Value); Take a look at the output window and note that the employee’s first name and the updated salary are displayed there. Binding to stored procedure output values. If you only need to return a single scalar value, rather than a collection of complex types, you can bypass the need to use SYS_REFCURSORs and the resulting App .Config configuration file by binding directly to stored procedure parameter output values in your code and allowing the imported function to simply return null. Earlier you ran a script (HR_SP.SQL) that created the UPDATE_AND_RETURN_SALARY_BINDV procedure and added it to the entity model. The UPDATE_AND_RETURN_SALARY_BINDV procedure accepts an employee ID and a salary increase amount, and it includes an output NUMBER parameter containing the employee’s new salary. In the Model Browser under HRModel.Store, click the Stored Procedures node, and then right-click UPDATE_AND_RETURN_SALARY_BINDV. From the menu, choose Add Function Import. In the Add Function Import dialog box, select None for Returns a Collection Of (because the Oracle stored procedure did not include a SYS_REFCURSOR, this function cannot return a value), and click OK. In your project’s program file, uncomment the next block of code—// CALLING A STORED PROCEDURE VIA IMPORT FUNCTION (USING OUTPUT BIND VARIABLE)—shown in Listing 3. Note that the code in Listing 3 includes the following line to set up the output bind variable: ObjectParameter newsal = new ObjectParameter("NEWSAL", typeof(decimal)); The first argument to this particular ObjectParameter constructor must be set to the name of the PL/SQL output parameter. Build the code and step into it. Take a look at the output window, and you can see that the employee’s updated salary is displayed there and no configuration change to the App.config file was required. Stored Procedure Mappings The entity model also supports “mapping” stored procedures to insert, update, and delete operations on Entities. When these operations occur, the mapped stored procedure will fire. For this article, the INSERT_EMPLOYEE procedure will fire every time a new Employee entity is created. This stored procedure was included in the HR_SP.SQL script you ran earlier, and because it returns an output value, it must include an output SYS_REFCURSOR in its parameter list. (The metadata for that REF CURSOR was included when you earlier copied the contents of the App.Config.txt file to the App.Config file.) To enable this stored procedure mapping, first open up Entity Designer, right-click Employee, and select Stored Procedure Mapping. This will open the Mapping Details pane at the bottom of the designer (as shown in Figure 3).
Figure 3: Entity Designer; Mapping Details In Mapping Details, select <Select Insert Function> and select the INSERT_EMPLOYEE stored procedure. By default, mappings will be created between the entity and the procedure. Notice that this Oracle stored procedure accepts as its parameters all of the data for the Employee entity except for the EMPLOYEE_ID. The stored procedure uses a sequence to generate an EMPLOYEE_ID, inserts a row into Oracle Database, and then returns the generated EMPLOYEE_ID inside of a SYS_REFCURSOR. This ensures that the Entity is consistent. Under Result Column Bindings, enter EMP_ID and press tab. EMP_ID is the name of the column in the REF CURSOR that contains the new id. When tab is pressed, a mapping is created by default to the EMPLOYEE_ID member of the entity. Uncomment the next section of code in your program file—// MAPPING A SPROC WITH SEQUENCES—which creates a new Employee entity, adds it to the Employees collection, and then saves it. After you save the program file, note that the EMPLOYEE_ID now contains the sequence value that was generated and inserted into Oracle Database. Triggers and Sequences In addition to working with stored procedures that generate sequences, developers also work with triggers that generate sequences. Developers using Entity Framework will need to make sure that their entities are able to receive the new values being generated by triggers. To try out triggers and sequences with entities, first remove the Stored Procedure Mapping you just created so that there is no special processing occurring when a new Employee entity is created. Open the Entity Designer, right-click the Employees entity, and select Stored Procedure Mapping again. In the Mapping Details pane, clear the INSERT_EMPLOYEES entry by choosing <delete> from the list. Now add the trigger. From the Tools menu, select Run SQL Plus Script. Browse to the location where you extracted the code and scripts, select the triggers.sql script, select the HR connection from the list, and click Run. The INSERTEMPLOYEES trigger created by the script generates a new sequence for EMPLOYEE_ID whenever NULL is passed in for that value. If you were to attempt to create a new Employee entity now and save it, you would get a unique constraint violation, because the Entity Framework infrastructure would always pass a zero for the EMPLOYEE _ID value. Entity Framework needs to ignore the NOT NULL constraint on EMPLOYEE_ID and send Oracle Database a NULL. At the same time, Entity Framework needs to promise that a valid value will eventually be provided by the database server to the entity so that the NOT NULL constraint is not violated. Fortunately, the StoreGeneratedPattern property for entity members, such as EMPLOYEE_ID, will allow an entity to temporarily reconcile a NULL without violating a NOT NULL constraint and ensure that a value is generated to replace a NULL. Due to an issue in Visual Studio, it is not currently possible to set the StoreGeneratedPattern property through the product’s user interface. Instead, to set this property, you must edit the underlying model XML file. In Solution Explorer, right-click HRModel1.edmx, choose Open with, and then XML Text Editor. Scroll down until you find the entry for EMPLOYEE_ID and after "Precision = 6" add "StoreGeneratedPattern="Identity" Uncomment the last block of code in your program file (// TRIGGERS WITH SEQUENCES) and execute it. Note that the value of EMPLOYEE_ID is automatically populated with the newly generated sequence. Model First Up to now, this article has followed a “Database First” paradigm—the entities were created based on whatever the database already contains. There’s another paradigm, “Model First,” in which the entities are designed and created first and then the database schema objects are created to store them. Oracle Developer Tools for Visual Studio offers a wizard to make Model First easy by automatically generating the required data definition language (DDL) scripts to create the database objects. There are currently two Model First choices for generating DDL scripts: generating a table per type and generating a table per hierarchy. To demonstrate this, you will modify the Employees entity in the Entity Designer and then regenerate the Oracle database tables needed to store the new design.
In the Entity Designer, right-click the Employee entity and select Add -> Scalar Property. Name the property ADDRESS. Right-click in the white space in the Entity Designer and choose Properties. In the Properties window, change the Database Schema Name to HR, select SSDLtoOracle.tt for the DDL Generation Template, and select Generate Oracle via T4(TPT).xaml for the Database Generation Workflow property (as shown in Figure 4). These settings ensure that the Oracle-provided DDL generation code is used and that the Model First paradigm is implemented.
Figure 4: Entity Designer; Properties Finally, right-click in the Entity Designer and select Generate Database for Model. The DDL code is generated. Click Finish to save the script to the filename in the Save DDL As field. Note that DELETE statements in the DDL code are commented out for safety. Remove the comments before you use the script to modify an existing schema. Summary Entity Framework enables developers to work with a conceptual data model rather than a database. With Entity Framework, Oracle Data Provider for .NET, and Oracle Developer Tools for Visual Studio, developers can start with an Oracle Database, create an entity, and query that entity using Entity SQL and LINQ to Entities. Oracle developers can also use PL/SQL stored procedures, triggers, and sequences with an entity. And rather than start with the database, developers can first create an entity model and generate a database from that model. |
Tuesday, December 2, 2014
Using Entity Framework with Oracle Data Provider for .NET.


Subscribe to:
Post Comments (Atom)
No comments:
Post a Comment