A nice comparison is given for SharePoint Server 2010 as a produce for enterprise collaboration, file sharing, web databases, social networking and web publishing.
http://www.koneka.com/blog/sharepoint-2010-features-and-limitations
A nice comparison is given for SharePoint Server 2010 as a produce for enterprise collaboration, file sharing, web databases, social networking and web publishing.
http://www.koneka.com/blog/sharepoint-2010-features-and-limitations
Users yet not realized the full power of content types and how they can help enforce consistent policies, templates and metadata while also helping end users to realize the business value of using SharePoint and further driving adoption. content types can help with governance by applying retention policies consistently.
Here are a few key concepts of content type:
Here are some of the key resources that I often point customers to as they get started with leveraging content types:
| http://www.oracle.com/technetwork/issue-archive/2011/11-sep/o51odt-453447.html Using Entity Framework with Oracle Data Provider for .NET. Object-relational mapping (ORM) technologies enable developers to write object-oriented code against a conceptual model of their data rather than accessing the database directly. For example, with an ORM, a developer can make an update to an instance of an EMPLOYEE class or request a collection of EMPLOYEE instances rather than executing the equivalent UPDATE or SELECT SQL statements against the EMPLOYEES table in an Oracle database. Two popular ORMs for .NET developers are NHibernate and Microsoft’s Entity Framework. Both solutions integrate with Microsoft Visual Studio; leverage designers, wizards, and code templates; and require a layer of code to handle the mapping to an Oracle database. Oracle Data Provider for .NET (ODP.NET) and Oracle Developer Tools for Visual Studio provide that mapping layer as well as Visual Studio enhancements to enable .NET developers to target Oracle Database with their Entity Framework applications. In this article, I’ll demonstrate some common development tasks that use Entity Framework to target Oracle Database. (For information on NHibernate, visit nhforge.org.) Setup To work through the examples in this article, you’ll need Microsoft Visual Studio 2010 Professional (or a later release). You’ll also need to download and install ODP.NET and Oracle Developer Tools for Visual Studio Release 11.2.0.2.40 or later. Both of these products are included as part of the Oracle Data Access Components package, which can be downloaded from the Oracle Technology Network .NET Developer Center. All of Oracle’s .NET products are available for free from the Oracle Technology Network Website. It’s important to note that earlier versions of this Oracle .NET software do not support Entity Framework; the integrated Visual Studio designers will not work properly, and you will see errors such as “The store provider factory type ’Oracle.DataAccess.Client.OracleClientFactory’ does not implement the IServiceProvider interface” if you attempt to run already compiled Entity Framework code. If you are unsure of which version of the Oracle .NET software you have, you can check the About window (Help -> About Microsoft Visual Studio). You should see “Oracle Developer Tools for Visual Studio” followed by the version number. The application you create in this article will use tables that are part of the Oracle database sample HR schema, so you’ll also need access to an Oracle database and the HR schema. To begin the setup for the article, first confirm that you have a connection to the HR schema. From Visual Studio, right-click the Data Connections node in Server Explorer and choose Add Connection. When the dialog box appears, make sure that the Data source is set to Oracle ODP.NET. From the Data source name list, select the database alias and then provide the User name and Password for the HR schema. Download code and SQL scripts for this article and extract the contents. From the Tools menu in Visual Studio, select Run SQL Plus Script. Browse to the location where you extracted the code and SQL scripts, select the HR_SP.SQL script, select the HR connection from the list, and click Run. Check the Visual Studio output window to make sure there were no errors. Right-click the Procedures node in Server Explorer and choose Refresh. The Entity Data Model Wizard and Designer Use the Visual Studio Entity Data Model Wizard as the starting point for building an Entity Framework-based application. To begin, create a new project. From the File menu select New -> Project. Select Visual C#:Windows -> Console Application. Rename the project EntityFramework, and click OK. Open Solution Explorer, right-click EntityFramework, and select Add -> New Item. In the Add New Item window, choose ADO.NET Entity Data Model, enter HRModel.edmx as the Name, and click Add. The Entity Data Model Wizard will appear. In the first screen, Choose Model Contents, select Generate from database, and click Next. Select the data connection that you created earlier and the Yes, include the sensitive data in the connection string radio button. Enter HREntities in the text field under the Save entity connection settings in AppConfig as checkbox and click Next. In the Choose Your Database Objects screen, select DEPARTMENTS and EMPLOYEES from the Tables group and INSERT_EMPLOYEE, UPDATE_AND_RETURN_SALARY, and UPDATE_AND_RETURN_SALARY_BINDV from the Stored Procedures group. Enter HRModel in the Model Namespace field and click Finish. The Entity Data Model Designer will open and display a visualization of the newly created Employee and Department entities and their relationships, as shown in Figure 1.
Figure 1: Entity Data Model Designer Entity SQL Now that you have some entities backed up by ODP.NET and Oracle Database, you can perform operations on them. As entities are created, modified, and deleted, these changes will be automatically reflected seamlessly in Oracle Database. Let’s add some program code to try this out. In Solution Explorer, right-click References and add a reference to Oracle.DataAccess.dll. If multiple versions of the DLL are present, reference Release 11.2.0.2.40 or later. Replace the contents of your new project’s program file (Program.cs) with the code of the Program.cs file included in the code download for this article. There are several namespaces at the top of the file, most importantly System.Linq, System.Data.EntityClient, System.Data.EntityModel, and Oracle.DataAccess.Client. One way to perform queries on entities is to use Entity SQL, which is a SQL-like language. It is backed by the ADO.NET data access model, so the Entity SQL code is very similar to common database-specific ADO.NET implementations such as ODP.NET. The difference is that with Entity SQL, the entities—not the database objects—are queried by Entity SQL. In your updated program file, uncomment the first block of code (// Entity SQL -- Retrieve employees with ID number less than max_id), shown in Listing 1. Build and step through the code. Note that the EntityConnection, EntityCommand, and EntityDataReader classes are created and data is fetched from these entities. Code Listing 1: Entity SQL code for Program.cs // Entity SQL -- Retrieve employees with ID number less than max_id int max_id = 110; string esql = "select e.EMPLOYEE_ID, e.FIRST_NAME, e.SALARY from HREntities.EMPLOYEEs as e where e.EMPLOYEE_ID < " + max_id; EntityConnection econn = new EntityConnection("name=HREntities"); econn.Open(); EntityCommand ecmd = econn.CreateCommand(); ecmd.CommandText = esql; EntityDataReader ereader = ecmd.ExecuteReader(CommandBehavior.SequentialAccess); Console.WriteLine("Entity SQL Result"); while (ereader.Read()) { Console.WriteLine("ID: " + ereader.GetValue(0) + " Name: " + ereader.GetValue(1) + " Salary: " + ereader.GetValue(2)); } LINQ to Entities Another way to perform queries on entities is to use LINQ to Entities. LINQ (Language-Integrated Query) is a general-purpose query facility built into the .NET Framework that accesses all sources of information, including relational data, XML, and now entities. To try LINQ to Entities, first uncomment the second block of code in the program file (// LINQ to Entities query -- Retrieve employees with ID number less than max_id) shown in Listing 2 and examine it. Code Listing 2: LINQ to Entities code for Program.cs // LINQ to Entities query -- Retrieve employees with ID number less than max_id int max_id = 110; var Employees = from e in ctx.EMPLOYEES where e.EMPLOYEE_ID < max_id select e; Console.WriteLine("LINQ to Entities Result"); foreach (var Employee in Employees) { Console.WriteLine("ID: " + Employee.EMPLOYEE_ID + " Name: " + Employee.FIRST_NAME + " Salary: " + Employee.SALARY); } The first section of this code block contains the LINQ query: var Employees = from e in ctx.EMPLOYEES where e.EMPLOYEE_ID < max_id select e; The remaining code in this block fetches and displays employee records. Step through this code and view the results. Calling Stored Procedures Oracle developers can leverage PL/SQL stored procedures, with limitations, within the entity framework via Entity Framework Function Imports (used to call the procedures explicitly) and stored procedure mappings (which are automatically called for entity Insert, Update, and Delete operations). Only Oracle stored procedures can be called by Entity Framework, not stored functions. (Oracle stored functions can be used if they are wrapped inside of a stored procedure that uses an OUT parameter for the stored function return value.) The Entity Framework maps Oracle stored procedures to Entity Framework functions. If an Entity Framework function mapped to a stored procedure is to have a return value other than null, the value must be provided by the Oracle stored procedure as an OUT parameter of the type SYS_REFCURSOR. Furthermore, only the first REF CURSOR in the parameter list is used as the Entity Framework function return value; any other REF CURSORS in the list are ignored. And because the metadata for this REF CURSOR is not known at design time, you must add this information to your App.Config file. Running stored procedures with SYS_REFCURSORs and App.Config configuration. To try out PL/SQL stored procedures with entities, first update the App.Config file. In the files you downloaded, find App.Config.txt and cut and paste the contents into the App.Config file in your project somewhere after the <ConnectionStrings> section. (For more information on the format of this metadata, refer to ODP.NET online help in the “Implicit REF CURSOR Binding Support” section.) Earlier you ran a script (HR_SP.SQL) that created the UPDATE_AND_RETURN_SALARY procedure and added it to the entity model. This procedure accepts an employee ID and a salary increase amount, and then it outputs a REF CURSOR containing the employee’s first name and the new salary. To get your application ready to call the UPDATE_AND_RETURN_SALARY procedure, first open the Model Designer, and then view the Model Browser (see Figure 1). Under HRModel.Store, click the Stored Procedures node, and then right-click UPDATE_AND_RETURN_SALARY. From the menu, choose Add Function Import. In the Add Function Import dialog box (see Figure 2), for Returns a Collection Of, select Complex. Click Get Column Information. The column information will be retrieved from the App.Config file. To call the method from .NET, you will use the name listed in the Function Import Name field (in this case, UPDATE_AND_RETURN_SALARY). Click Create New Complex Type and click OK. In the Model Browser, you will now see UPDATE_AND_RETURN_SALARY under HRModel.edmx -> EntityContainer: HREntities -> Function Imports.
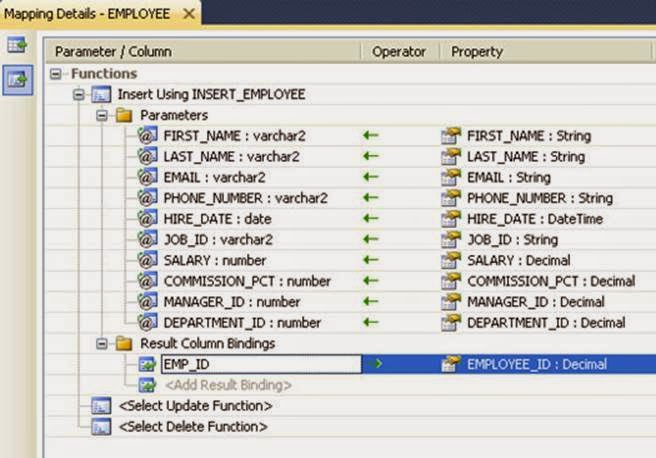
Figure 2: Add Function Import dialog box In your project’s program file, uncomment the next block of code—// CALLING A STORED PROCEDURE VIA IMPORT FUNCTION (RETURNING VALUES)—shown in Listing 3. Build and step into it. Code Listing 3: Code for calling stored procedure in Program.cs // CALLING A STORED PROCEDURE VIA IMPORT FUNCTION (RETURNING VALUES) int empid = 100; int raise = 9000; foreach (var result in ctx.UPDATE_AND_RETURN_SALARY(empid, raise)) { Console.WriteLine("Name: " + result.FIRST_NAME + " Updated Salary: " + result.SALARY); } Console.WriteLine(); Console.ReadLine(); // CALLING A STORED PROCEDURE VIA IMPORT FUNCTION (USING OUTPUT BIND VARIABLE) int empid = 100; int raise = 1111; ObjectParameter newsal = new ObjectParameter("NEWSAL", typeof(decimal)); ctx.UPDATE_AND_RETURN_SALARY_BINDV(empid, raise, newsal); Console.WriteLine(newsal.Value); Take a look at the output window and note that the employee’s first name and the updated salary are displayed there. Binding to stored procedure output values. If you only need to return a single scalar value, rather than a collection of complex types, you can bypass the need to use SYS_REFCURSORs and the resulting App .Config configuration file by binding directly to stored procedure parameter output values in your code and allowing the imported function to simply return null. Earlier you ran a script (HR_SP.SQL) that created the UPDATE_AND_RETURN_SALARY_BINDV procedure and added it to the entity model. The UPDATE_AND_RETURN_SALARY_BINDV procedure accepts an employee ID and a salary increase amount, and it includes an output NUMBER parameter containing the employee’s new salary. In the Model Browser under HRModel.Store, click the Stored Procedures node, and then right-click UPDATE_AND_RETURN_SALARY_BINDV. From the menu, choose Add Function Import. In the Add Function Import dialog box, select None for Returns a Collection Of (because the Oracle stored procedure did not include a SYS_REFCURSOR, this function cannot return a value), and click OK. In your project’s program file, uncomment the next block of code—// CALLING A STORED PROCEDURE VIA IMPORT FUNCTION (USING OUTPUT BIND VARIABLE)—shown in Listing 3. Note that the code in Listing 3 includes the following line to set up the output bind variable: ObjectParameter newsal = new ObjectParameter("NEWSAL", typeof(decimal)); The first argument to this particular ObjectParameter constructor must be set to the name of the PL/SQL output parameter. Build the code and step into it. Take a look at the output window, and you can see that the employee’s updated salary is displayed there and no configuration change to the App.config file was required. Stored Procedure Mappings The entity model also supports “mapping” stored procedures to insert, update, and delete operations on Entities. When these operations occur, the mapped stored procedure will fire. For this article, the INSERT_EMPLOYEE procedure will fire every time a new Employee entity is created. This stored procedure was included in the HR_SP.SQL script you ran earlier, and because it returns an output value, it must include an output SYS_REFCURSOR in its parameter list. (The metadata for that REF CURSOR was included when you earlier copied the contents of the App.Config.txt file to the App.Config file.) To enable this stored procedure mapping, first open up Entity Designer, right-click Employee, and select Stored Procedure Mapping. This will open the Mapping Details pane at the bottom of the designer (as shown in Figure 3).
Figure 3: Entity Designer; Mapping Details In Mapping Details, select <Select Insert Function> and select the INSERT_EMPLOYEE stored procedure. By default, mappings will be created between the entity and the procedure. Notice that this Oracle stored procedure accepts as its parameters all of the data for the Employee entity except for the EMPLOYEE_ID. The stored procedure uses a sequence to generate an EMPLOYEE_ID, inserts a row into Oracle Database, and then returns the generated EMPLOYEE_ID inside of a SYS_REFCURSOR. This ensures that the Entity is consistent. Under Result Column Bindings, enter EMP_ID and press tab. EMP_ID is the name of the column in the REF CURSOR that contains the new id. When tab is pressed, a mapping is created by default to the EMPLOYEE_ID member of the entity. Uncomment the next section of code in your program file—// MAPPING A SPROC WITH SEQUENCES—which creates a new Employee entity, adds it to the Employees collection, and then saves it. After you save the program file, note that the EMPLOYEE_ID now contains the sequence value that was generated and inserted into Oracle Database. Triggers and Sequences In addition to working with stored procedures that generate sequences, developers also work with triggers that generate sequences. Developers using Entity Framework will need to make sure that their entities are able to receive the new values being generated by triggers. To try out triggers and sequences with entities, first remove the Stored Procedure Mapping you just created so that there is no special processing occurring when a new Employee entity is created. Open the Entity Designer, right-click the Employees entity, and select Stored Procedure Mapping again. In the Mapping Details pane, clear the INSERT_EMPLOYEES entry by choosing <delete> from the list. Now add the trigger. From the Tools menu, select Run SQL Plus Script. Browse to the location where you extracted the code and scripts, select the triggers.sql script, select the HR connection from the list, and click Run. The INSERTEMPLOYEES trigger created by the script generates a new sequence for EMPLOYEE_ID whenever NULL is passed in for that value. If you were to attempt to create a new Employee entity now and save it, you would get a unique constraint violation, because the Entity Framework infrastructure would always pass a zero for the EMPLOYEE _ID value. Entity Framework needs to ignore the NOT NULL constraint on EMPLOYEE_ID and send Oracle Database a NULL. At the same time, Entity Framework needs to promise that a valid value will eventually be provided by the database server to the entity so that the NOT NULL constraint is not violated. Fortunately, the StoreGeneratedPattern property for entity members, such as EMPLOYEE_ID, will allow an entity to temporarily reconcile a NULL without violating a NOT NULL constraint and ensure that a value is generated to replace a NULL. Due to an issue in Visual Studio, it is not currently possible to set the StoreGeneratedPattern property through the product’s user interface. Instead, to set this property, you must edit the underlying model XML file. In Solution Explorer, right-click HRModel1.edmx, choose Open with, and then XML Text Editor. Scroll down until you find the entry for EMPLOYEE_ID and after "Precision = 6" add "StoreGeneratedPattern="Identity" Uncomment the last block of code in your program file (// TRIGGERS WITH SEQUENCES) and execute it. Note that the value of EMPLOYEE_ID is automatically populated with the newly generated sequence. Model First Up to now, this article has followed a “Database First” paradigm—the entities were created based on whatever the database already contains. There’s another paradigm, “Model First,” in which the entities are designed and created first and then the database schema objects are created to store them. Oracle Developer Tools for Visual Studio offers a wizard to make Model First easy by automatically generating the required data definition language (DDL) scripts to create the database objects. There are currently two Model First choices for generating DDL scripts: generating a table per type and generating a table per hierarchy. To demonstrate this, you will modify the Employees entity in the Entity Designer and then regenerate the Oracle database tables needed to store the new design.
In the Entity Designer, right-click the Employee entity and select Add -> Scalar Property. Name the property ADDRESS. Right-click in the white space in the Entity Designer and choose Properties. In the Properties window, change the Database Schema Name to HR, select SSDLtoOracle.tt for the DDL Generation Template, and select Generate Oracle via T4(TPT).xaml for the Database Generation Workflow property (as shown in Figure 4). These settings ensure that the Oracle-provided DDL generation code is used and that the Model First paradigm is implemented.
Figure 4: Entity Designer; Properties Finally, right-click in the Entity Designer and select Generate Database for Model. The DDL code is generated. Click Finish to save the script to the filename in the Save DDL As field. Note that DELETE statements in the DDL code are commented out for safety. Remove the comments before you use the script to modify an existing schema. Summary Entity Framework enables developers to work with a conceptual data model rather than a database. With Entity Framework, Oracle Data Provider for .NET, and Oracle Developer Tools for Visual Studio, developers can start with an Oracle Database, create an entity, and query that entity using Entity SQL and LINQ to Entities. Oracle developers can also use PL/SQL stored procedures, triggers, and sequences with an entity. And rather than start with the database, developers can first create an entity model and generate a database from that model. |
Every application needs data. That seems rather obvious, doesn't it? An application is almost always built on top of database tables. Those tables are full of different kinds of data. And the programs you write—whether they are in PL/SQL or another language—manipulate that data. It is, therefore, extremely important for you to be aware of the different datatypes supported by PL/SQL and how you can work with those datatypes.
As you might expect, there is an awful lot to learn about datatypes, and not all of that knowledge can fit into a single article. So I will start with one of the most common types of data: strings. Very few database tables and programs do not contain strings—strings such as a company name, address information, descriptive text, and so on. As a result, you quite often need to do the following:
· Declare string variables and constants
· Manipulate the contents of a string (remove characters, join together multiple strings, and so on)
This article gives you the information you need to begin working with strings in your PL/SQL programs.
What Is a String?
A string, also referred to as character data, is a sequence of selected symbols from a particular set of characters. In other words, the symbols in a string might consist of English letters, such as "A" or "B." They might also consist of Chinese characters, such as 字串.
There are three kinds of strings in PL/SQL:
Fixed-length strings. The string is right-padded with spaces to the length specified in the declaration.
Variable-length strings. A maximum length for the string is specified (and it must be no greater than 32,767), but no padding takes place.
Character large objects (CLOBs). CLOBs are variable-length strings that can be up to 128 terabytes.
Strings can be literals or variables. A string literal begins and ends with a single quotation mark:
'This is a string literal' If you need to embed a single quote inside a string literal, you can type in two single quotes right next to one another, as in:
'This isn''t a date' You can also use the "q" character to indicate an alternative terminating character for the literal:
q'[This isn't a date]' A string variable is an identifier declared with a string datatype and then assigned a value (which could be a literal or an expression).
To work with strings in your PL/SQL programs, you declare variables to hold the string values. To declare a string variable, you must select from one of the many string datatypes Oracle Database offers, including CHAR, NCHAR, VARCHAR2, NVARCHAR2, CLOB, and NCLOB. The datatypes that are prefixed with an "N" are "national character set" datatypes, which means they are used to store Unicode character data. (Unicode is a universal encoded character set that can store information in any language using a single character set.)
To declare a variable-length string, you must provide the maximum length of that string. The following code declares a variable, using the VARCHAR2 datatype, that will hold a company name, which cannot (in this declaration) have more than 100 characters:
DECLARE l_company_name VARCHAR2(100); You must provide the maximum length; if you leave it out, Oracle Database raises a compile error, as shown below:
SQL> DECLARE 2 l_company_name VARCHAR2; 3 BEGIN 4 l_company_name := 'Oracle Corporation'; 5 END; 6 / l_company_name VARCHAR2; * ERROR at line 2: ORA-06550: line 2, column 21: PLS-00215: String length constraints must be in range (1 .. 32767) To declare a fixed-length string, use the CHAR datatype:
DECLARE l_yes_or_no CHAR(1) := 'Y'; With CHAR (unlike with VARCHAR2) you do not have to specify a maximum length for a fixed-length variable. If you leave off the length constraint, Oracle Database automatically uses a maximum length of 1. In other words, the two declarations below are identical:
DECLARE l_yes_or_no1 CHAR(1) := 'Y'; l_yes_or_no2 CHAR := 'Y'; If you declare a CHAR variable with a length greater than 1, Oracle Database automatically pads whatever value you assign to that variable with spaces to the maximum length specified.
Finally, to declare a character large object, use the CLOB datatype. You do not specify a maximum length; the length is determined automatically by Oracle Database and is based on the database block size. Here is an example:
DECLARE l_lots_of_text CLOB; So, how do you determine which datatype to use in your programs? Here are some guidelines:
· If your string might contain more than 32,767 characters, use the CLOB (or NCLOB) datatype.
· If the value assigned to a string always has a fixed length (such as a U.S. Social Security number, which always has the same format and length, NNN-NN-NNNN), use CHAR (or NCHAR).
· Otherwise (and, therefore, most of the time), use the VARCHAR2 datatype (or NVACHAR2, when working with Unicode data).
Using the CHAR datatype for anything but strings that always have a fixed number of characters can lead to unexpected and undesirable results. Consider the following block, which mixes variable and fixed-length strings:
DECLARE l_variable VARCHAR2 (10) := 'Logic'; l_fixed CHAR (10) := 'Logic'; BEGIN IF l_variable = l_fixed THEN DBMS_OUTPUT.put_line ('Equal'); ELSE DBMS_OUTPUT.put_line ('Not Equal'); END IF; END; At first glance, you would expect that the word "Equal" would be displayed after execution. That is not the case. Instead, "Not Equal" is displayed, because the value of l_fixed has been padded to a length of 10 with spaces. Consider the padding demonstrated in the following block; you would expect the block to display "Not Equal":
BEGIN IF 'Logic' = 'Logic ' THEN DBMS_OUTPUT.put_line ('Equal'); ELSE DBMS_OUTPUT.put_line ('Not Equal'); END IF; END; You should, as a result, be very careful about the use of the CHAR datatype, whether as the type of a variable, database column, or parameter.
Once you have declared a variable, you can assign it a value, change its value, and perform operations on the string contained in that variable using string functions and operators.
For the rest of this article, I focus on the VARCHAR2 datatype.
Using Built-in Functions with Strings
Once you assign a string to a variable, you most likely need to analyze the contents of that string, change its value in some way, or combine it with other strings. Oracle Database offers a wide array of built-in functions to help you with all such requirements. Let's take a look at the most commonly used of these functions.
Concatenate multiple strings. One of the most basic and frequently needed operations on strings is to combine or concatenate them together. PL/SQL offers two ways to do this:
· The CONCAT built-in function
· The || (concatenation) operator
The CONCAT function accepts two strings as its arguments and returns those two strings "stuck together." The concatenation operator also concatenates together two strings, but it is easier to use when combining more than two strings, as you can see in this example:
DECLARE l_first VARCHAR2 (10) := 'Steven'; l_middle VARCHAR2 (5) := 'Eric'; l_last VARCHAR2 (20) := 'Feuerstein'; BEGIN /* Use the CONCAT function */ DBMS_OUTPUT.put_line ( CONCAT ('Steven', 'Feuerstein')); /* Use the || operator */ DBMS_OUTPUT.put_line ( l_first || ' ' || l_middle || ' ' || l_last); END; / The output from this block is:
StevenFeuerstein Steven Eric Feuerstein
In my experience, you rarely encounter the CONCAT function. Instead, the || operator is almost universally used by PL/SQL developers.
If either of the strings passed to CONCAT or || is NULL or '' (a zero-length string), both the function and the operator simply return the non-NULL string. If both strings are NULL, NULL is returned.
Change the case of a string. Three built-in functions change the case of characters in a string:
· UPPER changes all characters to uppercase.
· LOWER changes all characters to lowercase.
· INITCAP changes the first character of each word to uppercase (characters are delimited by a white space or non-alphanumeric character).
Listing 1 shows some examples that use these case-changing functions.
Code Listing 1: Examples of case-changing functions
SQL> DECLARE 2 l_company_name VARCHAR2 (25) := 'oraCLE corporatION'; 3 BEGIN 4 DBMS_OUTPUT.put_line (UPPER (l_company_name)); 5 DBMS_OUTPUT.put_line (LOWER (l_company_name)); 6 DBMS_OUTPUT.put_line (INITCAP (l_company_name)); 7 END; 8 / ORACLE CORPORATION oracle corporation Oracle Corporation Extract part of a string. One of the most commonly utilized built-in functions for strings is SUBSTR, which is used to extract a substring from a string. When calling SUBSTR, you provide the string, the position at which the desired substring starts, and the number of characters in the substring.
Listing 2 shows some examples that use the SUBSTR function.
Code Listing 2: Examples of SUBSTR function
DECLARE l_company_name VARCHAR2 (6) := 'Oracle'; BEGIN /* Retrieve the first character in the string */ DBMS_OUTPUT.put_line ( SUBSTR (l_company_name, 1, 1)); /* Retrieve the last character in the string */ DBMS_OUTPUT.put_line ( SUBSTR (l_company_name, -1, 1)); /* Retrieve three characters, starting from the second position. */ DBMS_OUTPUT.put_line ( SUBSTR (l_company_name, 2, 3)); /* Retrieve the remainder of the string, starting from the second position. */ DBMS_OUTPUT.put_line ( SUBSTR (l_company_name, 2)); END; / The output from this block is:
O e rac racle As you can see, with the SUBSTR function you can specify a negative starting position for the substring, in which case Oracle Database counts backward from the end of the string. If you do not provide a third argument—the number of characters in the substring—Oracle Database automatically returns the remainder of the string from the specified position.
Find a string within another string. Use the INSTR function to determine where (and if) a string appears within another string. INSTR accepts as many as four arguments:
· The string to be searched (required).
· The substring of interest (required).
· The starting position of the search (optional). If the value is negative, count from the end of the string. If no value is provided, Oracle Database starts at the beginning of the string; that is, the starting position is 1.
· The Nth occurrence of the substring (optional). If no value is provided, Oracle Database looks for the first occurrence.
Listing 3 shows some examples that use the INSTR function.
Code Listing 3: Examples of INSTR function
BEGIN /* Find the location of the first "e" */ DBMS_OUTPUT.put_line ( INSTR ('steven feuerstein', 'e')); /* Find the location of the first "e" starting from position 6 */ DBMS_OUTPUT.put_line ( INSTR ('steven feuerstein' , 'e' , 6)); /* Find the location of the first "e" starting from the 6th position from the end of string and counting to the left. */ DBMS_OUTPUT.put_line ( INSTR ('steven feuerstein' , 'e' , -6)); /* Find the location of the 3rd "e" starting from the 6th position from the end of string. */ DBMS_OUTPUT.put_line ( INSTR ('steven feuerstein' , 'e' , -6 , 3)); END; / The output from this block is:
3 9 11 5 INSTR is a very flexible and handy utility. It can easily be used to determine whether or not a substring appears at all in a string. Here is a Boolean function that does just that:
CREATE OR REPLACE FUNCTION is_in_string ( string_in IN VARCHAR2 ,substring_in IN VARCHAR2) RETURN BOOLEAN IS BEGIN RETURN INSTR (string_in , substring_in) > 0; END is_in_string; / Pad a string with spaces (or other characters). I warned earlier about using the CHAR datatype, because Oracle Database pads your string value with spaces to the maximum length specified in the declaration.
However, there are times, primarily when generating reports, when you want to put spaces (or other characters) in front of or after the end of your string. For these situations, Oracle Database offers LPAD and RPAD.
When you call these functions, you specify the length to which you want your string padded and with what character or characters. If you do not specify any pad characters, Oracle Database defaults to padding with spaces.
Listing 4 shows some examples that use these LPAD and RPAD padding functions.
Code Listing 4: Examples of padding functions
DECLARE l_first VARCHAR2 (10) := 'Steven'; l_last VARCHAR2 (20) := 'Feuerstein'; l_phone VARCHAR2 (20) := '773-426-9093'; BEGIN /* Indent the subheader by 3 characters */ DBMS_OUTPUT.put_line ('Header'); DBMS_OUTPUT.put_line ( LPAD ('Sub-header', 13, '.')); /* Add "123" to the end of the string, until the 20 character is reached.*/ DBMS_OUTPUT.put_line ( RPAD ('abc', 20, '123')); /* Display headers and then values to fit within the columns. */ DBMS_OUTPUT.put_line ( /*1234567890x12345678901234567890x*/ 'First Name Last Name Phone'); DBMS_OUTPUT.put_line ( RPAD (l_first, 10) || ' ' || RPAD (l_last, 20) || ' ' || l_phone); END; / The output from this block is:
Header ...Sub-header abc12312312312312312 First Name Last Name Phone Steven Feuerstein 773-426-9093 Replace characters in a string. Oracle Database provides a number of functions that allow you to selectively change one or more characters in a string. You might need, for example, to replace all spaces in a string with the HTML equivalent (" ") so the text is displayed properly in a browser. Two functions take care of such needs for you:
· REPLACE replaces a set or pattern of characters with another set.
· TRANSLATE translates or replaces individual characters.
Listing 5 shows some examples of these two character-replacement built-in functions. Notice that when you are replacing a single character, the effect of REPLACE and TRANSLATE is the same. When replacing multiple characters, REPLACE and TRANSLATE act differently. The call to REPLACE asked that appearances of "abc" be replaced with "123." If, however, any of the individual characters (a, b, or c) appeared in the string outside of this pattern ("abc"), they would not be replaced.
Code Listing 5: Examples of character replacement functions
DECLARE l_name VARCHAR2 (50) := 'Steven Feuerstein'; BEGIN /* Replace all e's with the number 2. Since you are replacing a single character, you can use either REPLACE or TRANSLATE. */ DBMS_OUTPUT.put_line ( REPLACE (l_name, 'e', '2')); DBMS_OUTPUT.put_line ( TRANSLATE (l_name, 'e', '2')); /* Replace all instances of "abc" with "123" */ DBMS_OUTPUT.put_line ( REPLACE ('abc-a-b-c-abc' , 'abc' , '123')); /* Replace "a" with "1", "b" with "2", "c" with "3". */ DBMS_OUTPUT.put_line ( TRANSLATE ('abc-a-b-c-abc' , 'abc' , '123')); END; / The output from this block is:
St2v2n F2u2rst2in St2v2n F2u2rst2in 123-a-b-c-123 123-1-2-3-123 The call to TRANSLATE, however, specified that any occurrence of each of the individual characters be replaced with the character in the third argument in the same position.
Generally, you should use REPLACE whenever you need to replace a pattern of characters, while TRANSLATE is best applied to situations in which you need to replace or substitute individual characters in the string.
Remove characters from a string. What LPAD and RPAD giveth, TRIM, LTRIM, and RTRIM taketh away. Use these trim functions to remove characters from either the beginning (left) or end (right) of the string. Listing 6 shows an example of both RTRIM and LTRIM.
Code Listing 6: Examples of LTRIM and RTRIM functions
DECLARE a VARCHAR2 (40) := 'This sentence has too many periods....'; b VARCHAR2 (40) := 'The number 1'; BEGIN DBMS_OUTPUT.put_line ( RTRIM (a, '.')); DBMS_OUTPUT.put_line ( LTRIM ( b , 'ABCDEFGHIJKLMNOPQRSTUVWXYZ ' || 'abcdefghijklmnopqrstuvwxyz')); END; The output from this block is:
This sentence has too many periods 1 RTRIM removed all the periods, because the second argument specifies the character (or characters) to trim, in this case, a period. The call to LTRIM demonstrates that you can specify multiple characters to trim. In this case, I asked that all letters and spaces be trimmed from the beginning of string b, and I got what I asked for.
The default behavior of both RTRIM and LTRIM is to trim spaces from the beginning or end of the string. Specifying RTRIM(a) is the same as asking for RTRIM(a,' '). The same goes for LTRIM(a) and LTRIM(a,' ').
The other trimming function is just plain TRIM. TRIM works a bit differently from LTRIM and RTRIM, as you can see in this block:
DECLARE x VARCHAR2 (30) := '.....Hi there!.....'; BEGIN DBMS_OUTPUT.put_line ( TRIM (LEADING '.' FROM x)); DBMS_OUTPUT.put_line ( TRIM (TRAILING '.' FROM x)); DBMS_OUTPUT.put_line ( TRIM (BOTH '.' FROM x)); --The default is to trim --from both sides DBMS_OUTPUT.put_line ( TRIM ('.' FROM x)); --The default trim character --is the space: DBMS_OUTPUT.put_line (TRIM (x)); END;
The output from this block is:
Hi there!..... .....Hi there! Hi there! Hi there! .....Hi there!.....
With TRIM, you can trim from either side or from both sides. However, you can specify only a single character to remove. You cannot, for example, write the following:
TRIM(BOTH ',.;' FROM x)
If you need to remove more than one character from the front and back of a string, you need to use RTRIM and LTRIM:
RTRIM(LTRIM(x,',.;'),',.;')
You can also use TRANSLATE to remove characters from a string by replacing them with (or "translating" them into) NULL. You must, however, take care with how you specify this replacement. Suppose I want to remove all digits (0 through 9) from a string. My first attempt yields the following block:
BEGIN /* Remove all digits (0-9) from the string. */ DBMS_OUTPUT.put_line ( TRANSLATE ('S1t2e3v4e56n' , '1234567890' , '')); END; /
When I execute this block, however, nothing (well, a NULL string) is displayed. This happens because if any of the arguments passed to TRANSLATE are NULL (or a zero-length string), the function returns a NULL value.
So all three arguments must be non-NULL, which means that you need to put at the start of the second and third arguments a character that will simply be replaced with itself, as in the following:
BEGIN /* Remove all digits (0-9) from the string. */ DBMS_OUTPUT.put_line ( TRANSLATE ('S1t2e3v4e56n' , 'A1234567890' , 'A')); END; /
Now, "A" is replaced with "A" and the remaining characters in the string are replaced with NULL, so the string "Steven" is then displayed.
Good to Know
Beyond awareness of the basic properties of strings in PL/SQL and built-in functions, you can benefit by keeping the following points about long strings and maximum string sizes in mind.
When the string is too long. You must specify a maximum length when you declare a variable based on the VARCHAR2 type. What happens, then, when you try to assign a value to that variable whose length is greater than the maximum? Oracle Database raises the ORA-06502 error, which is also defined in PL/SQL as the VALUE_ERROR exception.
Here is an example of the exception being raised and propagated out of the block unhandled:
SQL> DECLARE 2 l_name VARCHAR2(3); 3 BEGIN 4 l_name := 'Steven'; 5 END; 6 / DECLARE * ERROR at line 1: ORA-06502: PL/SQL: numeric or value error: character string buffer too small ORA-06512: at line 4
Here is a rewrite of the same block that traps the VALUE_ERROR exception:
SQL> DECLARE 2 l_name VARCHAR2 (3); 3 BEGIN 4 l_name := 'Steven'; 5 EXCEPTION 6 WHEN VALUE_ERROR 7 THEN 8 DBMS_OUTPUT.put_line ( 9 'Value too large!'); 10 END; 11 / Value too large! Interestingly, if you try to insert or update a value in a VARCHAR2 column of a database table, Oracle Database raises a different error, which you can see below:
SQL> CREATE TABLE small_varchar2 2 ( 3 string_value VARCHAR2 (2) 4 ) 5 / Table created. SQL> BEGIN 2 INSERT INTO small_varchar2 3 VALUES ('abc'); 4 END; 5 / BEGIN * ERROR at line 1: ORA-12899: value too large for column "HR"."SMALL_VARCHAR2"."STRING_VALUE" (actual: 3, maximum: 2) ORA-06512: at line 2 Different maximum sizes. There are a number of differences between SQL and PL/SQL for the maximum sizes for string datatypes. In PL/SQL, the maximum size for VARCHAR2 is 32,767 bytes, while in SQL the maximum is 4,000 bytes. In PL/SQL, the maximum size for CHAR is 32,767 bytes, while in SQL the maximum is 2,000 bytes.
Therefore, if you need to save a value from a VARCHAR2 variable in the column of a table, you might encounter the ORA-12899 error. If this happens, you have two choices:
· Use SUBSTR to extract no more than 4,000 bytes from the larger string, and save that substring to the table. This option clearly has a drawback: you lose some of your data.
· Change the datatype of the column from VARCHAR2 to CLOB. This way, you can save all your data.
In PL/SQL, the maximum size for CLOB is 128 terabytes, while in SQL the maximum is just (4 GB - 1) * DB_BLOCK_SIZE.